Embarking on the journey of learning How to Sew an Invisible Zipper opens up a world of professional-looking finishes for your sewing projects. This guide is meticulously crafted to transform what might seem like a daunting task into an achievable skill, ensuring your creations boast a seamless and elegant appearance.
We will delve into the unique characteristics of invisible zippers, distinguishing them from their standard counterparts and exploring their essential components and applications. Understanding the specific tools and preparations required is the foundational step towards mastering this technique, setting the stage for a smooth and successful installation process.
Understanding Invisible Zippers

Invisible zippers, also known as concealed zippers, offer a sleek and seamless finish to sewing projects, making them a preferred choice for garments and accessories where a clean aesthetic is paramount. Unlike standard zippers, their teeth are specially designed to lie flat and are almost entirely hidden within the seam, providing a smooth, uninterrupted line. This makes them ideal for dresses, skirts, trousers, and even decorative elements where the zipper hardware should not detract from the overall design.The unique construction of an invisible zipper is key to its discreet appearance.
The zipper tape is typically made of polyester and is designed to be pressed open, allowing the fine, coiled teeth to be stitched very close to the edge of the fabric. This meticulous placement is what allows the zipper to practically disappear into the seam allowance.
Components and Functions of an Invisible Zipper
An invisible zipper consists of several key components, each playing a vital role in its functionality and appearance. Understanding these parts will help in their proper installation and troubleshooting.
- Zipper Coil: This is the defining feature of an invisible zipper. It is a continuous coil of polyester or nylon that forms the “teeth” of the zipper. The coil is typically sewn onto the zipper tape in a way that allows it to lie flat and be easily engaged by the slider.
- Zipper Tape: The fabric strip to which the zipper coil is attached. For invisible zippers, the tape is usually a coordinating color and designed to be pressed open and stitched very close to the edge.
- Slider: This is the mechanism that moves up and down the zipper coil, opening and closing the zipper. The slider for an invisible zipper is designed to fit snugly over the coil, further concealing it.
- Bottom Stop: Located at the bottom of the zipper, this prevents the slider from coming off the coil.
- Top Stops: Located at the top of the zipper, these prevent the slider from going beyond the end of the zipper teeth.
Typical Uses and Applications
The discreet nature of invisible zippers makes them suitable for a wide array of sewing projects where a polished and refined look is desired. Their ability to blend seamlessly into the fabric is their primary advantage.
- Garments: They are commonly used in the side seams or back seams of dresses, skirts, and trousers, especially in formal wear, evening gowns, and fitted garments where a smooth silhouette is important.
- Accessories: Invisible zippers are also found in handbags, clutches, and decorative cushions, contributing to a clean and professional finish.
- Home Decor: They can be used in pillow covers and other soft furnishings where the zipper should be as unobtrusive as possible.
Tools and Notions for Invisible Zipper Installation
Successfully installing an invisible zipper requires specific tools and notions that are designed to work with its unique construction. Using the correct equipment will ensure a neat and functional result.
- Invisible Zipper Foot: This is the most crucial tool. An invisible zipper foot has a groove on the underside that straddles the zipper coil, allowing the needle to stitch very close to the coil while keeping the zipper tape flat.
- Sharp Fabric Scissors: For precise cutting of fabric and zipper tape.
- Seam Ripper: Essential for correcting any mistakes.
- Iron and Ironing Board: For pressing the zipper tape open and preparing the fabric.
- Matching Thread: High-quality thread that matches your fabric and zipper.
- Pins: To secure the zipper in place before stitching.
- Marking Tool: Such as tailor’s chalk or a fabric pen, for marking seam lines.
Preparing Your Fabric and Zipper

Before we embark on the journey of sewing an invisible zipper, meticulous preparation of your fabric and the zipper itself is paramount. This foundational step ensures a smooth sewing process and a professional-looking finish. By addressing these preliminary stages thoroughly, you minimize potential issues and set yourself up for success.
Fabric Preparation: Pre-Washing and Pressing
Pre-washing and pressing your fabric are crucial steps that prevent shrinkage and remove any manufacturing residues that might interfere with the sewing process. This ensures that your finished garment will maintain its intended size and shape after the initial wash.
- Pre-washing: Always pre-wash your fabric according to the manufacturer’s instructions, using the same method you intend to use for the finished garment. This is especially important for natural fibers like cotton and linen, which are prone to shrinkage.
- Drying: Dry the fabric as you normally would. If you typically tumble dry, do so. If you air dry, hang it up.
- Pressing: Once completely dry, press the fabric thoroughly using a hot iron and appropriate pressing cloth if necessary. Aim for a crisp, flat surface. This removes wrinkles and ensures an accurate cutting and sewing experience.
Cutting the Fabric for the Zipper Opening
Accurate cutting of the fabric for the zipper opening is essential for a well-integrated zipper. The opening size will depend on the length of the invisible zipper you are using.
The general principle is to cut an opening that is slightly shorter than the zipper’s total length to allow for secure stitching at both ends. For example, if you have a 22-inch invisible zipper, you might cut your opening to be around 20 to 21 inches. Always refer to your pattern instructions for specific measurements, as they are tailored to the garment design.
Preparing the Invisible Zipper
Invisible zippers require a bit of special handling to ensure they lie flat and are easily sewn. The most important step is to gently press the coils.
- Pressing the Coils: Place the zipper face down on your ironing board. Using a medium-hot iron (test on a scrap piece of fabric first to ensure it won’t melt the coils), gently press along the zipper tape, avoiding direct contact with the plastic coils if possible. You can also place a pressing cloth over the zipper tape. This step helps to flatten the coils, making them easier to feed through the zipper foot and resulting in a smoother zipper insertion.
- Checking the Zipper: Ensure the zipper slides up and down smoothly. If it snags, re-press the coils.
Essential Items Checklist
Before you begin sewing, it’s beneficial to gather all necessary items to ensure a seamless workflow. This checklist helps prevent interruptions and ensures you have everything readily available.
| Item | Description |
|---|---|
| Invisible Zipper | Chosen for the correct length and color for your project. |
| Fabric | Pre-washed, dried, and pressed. |
| Sewing Machine | In good working order. |
| Invisible Zipper Foot | A specialized presser foot designed for invisible zippers. |
| Sharp Scissors or Rotary Cutter and Mat | For precise fabric cutting. |
| Fabric Marker or Chalk | For marking the zipper opening. |
| Pins | For securing the zipper to the fabric. |
| Iron and Ironing Board | For pressing fabric and zipper coils. |
| Thread | Matching your fabric and zipper. |
| Seam Ripper | For any necessary adjustments or corrections. |
The Special Foot and Stitching
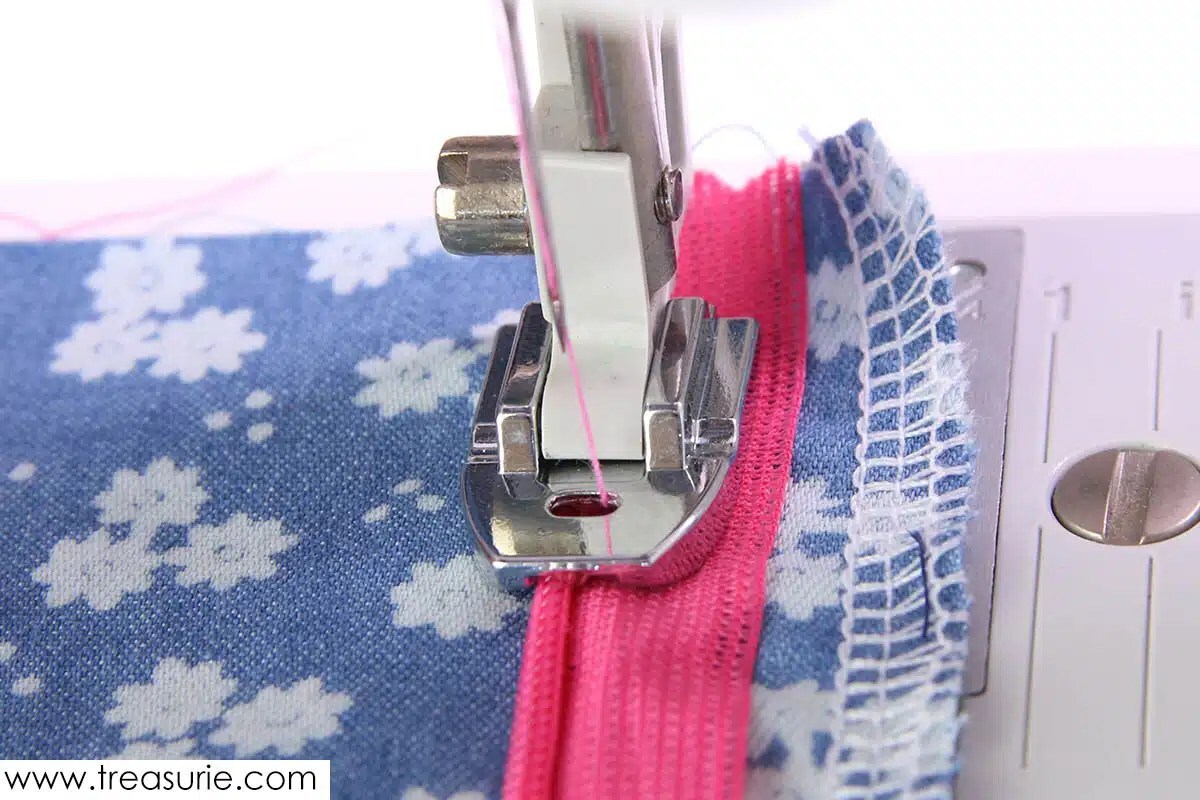
To achieve a truly invisible zipper, the right tools and techniques are paramount. The specialized presser foot designed for invisible zippers is not just a recommendation; it’s an essential component that dramatically simplifies the process and ensures a professional finish. This foot works in conjunction with specific stitching techniques to create a seam that conceals the zipper teeth beautifully.The invisible zipper foot is engineered with two channels on the underside, perfectly positioned to guide the zipper teeth.
These channels allow the needle to stitch very close to the zipper teeth, effectively hiding them within the seam. When the zipper is closed, it appears as though there is no zipper at all, just a neat seam.
Invisible Zipper Foot Attachment and Usage
Attaching and using the invisible zipper foot correctly is key to a successful outcome. Most sewing machines have a standard presser foot holder, and the invisible zipper foot typically attaches to this holder just like any other presser foot. Ensure it is securely fastened before beginning to sew.The foot is designed to be used in two primary positions:
- When stitching the left side of the zipper (from the perspective of the zipper’s right side facing up), the zipper teeth will be positioned in the right-hand channel of the foot.
- When stitching the right side of the zipper, the zipper teeth will be guided through the left-hand channel of the foot.
This dual-channel design allows you to stitch close to the zipper teeth on both sides, creating a flat and inconspicuous finish.
Recommended Stitch Length and Tension
For invisible zipper installation, a slightly shorter stitch length is generally recommended to ensure the zipper tape is securely held and the zipper teeth are enclosed effectively.
A stitch length of 1.5 to 2.0 millimeters is ideal for invisible zippers.
This shorter stitch length provides better control and a more durable seam. The tension of your sewing machine should be balanced as usual for your chosen thread and fabric. It is always a good practice to test your stitch length and tension on a scrap piece of fabric with a zipper before commencing on your project to ensure optimal results.
Best Practices for Guiding Fabric
The success of an invisible zipper stitch line relies heavily on how the fabric is guided under the presser foot. The goal is to keep the fabric flat and aligned, allowing the presser foot’s channels to do their work effectively.Here are some best practices:
- Ensure the zipper teeth are lying flat and are centered within the channels of the invisible zipper foot.
- Gently guide the fabric layers, keeping them taut but not stretched. Avoid pulling or pushing the fabric, as this can lead to uneven stitching or puckering.
- As you approach the end of the zipper tape, be mindful of the zipper pull. You may need to slightly move the zipper pull out of the way to continue stitching close to the end of the tape.
- Maintain a consistent distance from the zipper teeth throughout the stitching process. This consistency is what creates the “invisible” effect.
By carefully guiding the fabric and utilizing the specialized foot, you will achieve a clean, professional-looking seam that perfectly conceals your invisible zipper.
Sewing the Zipper – Step-by-Step
Now that you have prepared your fabric and zipper, and have the correct foot and stitch settings, we can move on to the crucial step of actually attaching the invisible zipper. This process requires precision to ensure the zipper remains hidden and functions smoothly. We will guide you through each stage, from initial placement to the final check.
Attaching the Zipper to the Fabric
The initial placement of the zipper is key to its invisibility. By placing the zipper right side down onto the fabric’s right side, we ensure that the zipper teeth are positioned correctly for concealment during the sewing process. This method creates a clean and professional finish.
- Lay one piece of your fabric right side up. Place the invisible zipper face down along the edge of the fabric, aligning the zipper teeth with the seam allowance. Ensure the zipper tape is positioned about 1/4 inch away from the raw edge of the fabric.
- Carefully pin the zipper tape to the fabric, distributing pins evenly along the length of the zipper.
- Repeat this process for the second piece of fabric, placing it right side down on top of the zipper tape, aligning the raw edges. Pin securely.
Stitching Along the Zipper Teeth
With the zipper accurately positioned, the next step is to stitch along the zipper teeth, keeping them concealed. The special invisible zipper foot is designed to guide your needle close to the teeth, ensuring a neat and hidden seam.
The goal here is to stitch as close to the zipper teeth as possible without actually catching them. This is where the specialized foot truly shines, as its groove allows the needle to get right next to the teeth. Start your stitch at the bottom of the zipper, where the teeth end, and stitch upwards towards the top stop. Maintain a consistent seam allowance, typically 1/4 inch, throughout this process.
Stitching the Second Side of the Zipper Opening
Once one side of the zipper is successfully stitched and concealed, you will repeat the process for the other side of the opening. This involves carefully maneuvering the fabric and zipper to maintain the correct alignment and ensure a continuous, hidden zipper.
After stitching the first side, you will need to pivot. Unzip the zipper partially. Then, reposition the fabric and the remaining side of the zipper tape. Align the second fabric piece right side down onto the zipper tape, just as you did initially. Pin securely.
Now, stitch this second side, again starting from the bottom of the zipper and stitching upwards, keeping the needle as close as possible to the zipper teeth. Ensure that your stitching meets neatly at the top and bottom to create a continuous line.
Checking Zipper Functionality and Appearance
After completing the initial stitching, it’s essential to verify that the zipper is functioning correctly and that the invisible zipper effect has been achieved. This inspection ensures a professional and aesthetically pleasing outcome.
Gently pull the zipper up and down to test its smoothness. It should move freely without catching or snagging. Examine the stitched line from the right side of the fabric. The zipper teeth should be almost entirely hidden, with only a thin line of stitching visible. If any part of the zipper teeth is showing, you may need to adjust your stitching slightly or consider a very narrow topstitch to further conceal it.
Ensure the two sides of the garment meet perfectly when the zipper is closed.
Finishing Touches and Troubleshooting
With the main stitching of your invisible zipper complete, the next crucial steps involve refining the appearance and addressing any potential hiccups. These finishing touches ensure a professional and seamless look, while understanding common troubleshooting tips will empower you to overcome challenges and achieve a perfectly integrated zipper.
Securing Zipper Ends
Properly securing the zipper ends at both the top and bottom of the opening is vital for durability and a clean aesthetic. This prevents the zipper pull from coming off and ensures the zipper lies flat against the fabric.To secure the top end of the zipper:
- After stitching the zipper tape to the seam allowance, carefully stitch over the very top edge of the zipper tape, close to the zipper stops. This creates a secure anchor point.
- You can reinforce this by backstitching a few times.
- Alternatively, a small bar tack can be sewn at this point for extra strength.
For the bottom end of the zipper:
- The bottom of an invisible zipper is typically secured by the seam that closes the rest of the garment or project.
- Ensure your seam line is sewn directly to the bottom of the zipper tape, enclosing it within the seam.
- If the zipper extends beyond the opening, trim the excess tape and secure the end with a few hand stitches or a small machine stitch to prevent fraying.
Trimming Excess Fabric and Thread
A neat finish is paramount for an invisible zipper to truly live up to its name. This involves carefully removing any stray threads and excess fabric that might detract from the seamless appearance.Before trimming:
- Inspect your stitching carefully to ensure all threads are secure and there are no loose ends.
- Check that the zipper tape is fully enclosed within the seam allowance where applicable.
Trimming process:
- Use sharp fabric scissors to trim away any excess seam allowance around the zipper tape, being careful not to cut into the zipper teeth or the main stitching.
- Trim any loose threads from your stitching. A seam ripper can be helpful for carefully removing any small, stubborn threads.
- If there is a significant amount of bulk at the bottom of the zipper where it meets the seam, consider grading the seam allowance to reduce thickness.
Common Issues and Solutions
Even with careful preparation, you might encounter a few common challenges when sewing invisible zippers. Understanding these issues and their solutions will help you achieve a flawless result.Common problems include:
- Wavy or Puckered Zipper Insertion: This often occurs if the fabric is stretched while stitching or if the zipper tape is not laid flat. Ensure you are not pulling or stretching the fabric as you sew. If puckering has already occurred, you may need to carefully unpick the stitching and re-sew, paying close attention to keeping the fabric and zipper tape smooth.
- Zipper Teeth Showing: This indicates that the stitch line is too far from the zipper teeth, allowing them to become visible. Adjust your stitching to be closer to the teeth, ensuring your special zipper foot is correctly positioned.
- Zipper Not Closing Smoothly: Sometimes, a stray thread or a bit of fabric caught in the teeth can cause resistance. Gently inspect the teeth and remove any obstructions. Ensure the zipper tape is not twisted or bunched up within the seam.
- Zipper Too Short or Too Long for the Opening: This is usually a preparation issue. Double-check your measurements and the placement of the zipper before you begin stitching. If the zipper is too long, you can sometimes shorten it by carefully stitching across the teeth at the desired end point, ensuring the zipper pull cannot pass this point. If too short, it will require replacement.
Achieving a Perfectly Smooth and Undetectable Zipper Insertion
The ultimate goal of sewing an invisible zipper is for it to blend seamlessly with the garment. Several techniques contribute to this professional finish.Key techniques include:
- Precise Pressing: After stitching, carefully press the seam allowance away from the zipper teeth. Use a pressing cloth to protect the zipper tape and teeth from direct heat. This helps the zipper lie flat and smooth.
- Accurate Stitch Placement: As mentioned in troubleshooting, the stitch line must be very close to the zipper teeth. The special foot for invisible zippers is designed to guide your stitching perfectly along the edge of the teeth.
- Matching Thread Color: Using a thread color that perfectly matches your fabric will make your stitching virtually disappear, further enhancing the invisibility of the zipper.
- Proper Zipper Tape Preparation: Ensure the zipper tape is pressed open and lies flat against the seam allowance before stitching. Any folds or wrinkles in the tape will translate to a less smooth zipper insertion.
- Careful Seam Finishing: Once the zipper is installed, finish the raw edges of the seam allowance to prevent fraying and bulk, which can affect the drape and appearance of the area around the zipper.
“The beauty of an invisible zipper lies in its subtlety; it should feel like a part of the garment, not an addition.”
Advanced Techniques and Variations

Once you’ve mastered the basic invisible zipper installation, you’ll find that this versatile technique can be adapted for a variety of sewing projects and fabric types. Exploring these advanced methods will elevate your sewing skills and open up new creative possibilities.This section delves into more complex applications of invisible zippers, focusing on how to achieve professional results in challenging situations and how to use them decoratively.
We will explore specific scenarios and offer practical solutions.
Invisible Zippers in Curved Seams
Installing an invisible zipper on a curved seam requires careful manipulation to ensure the zipper tape lies smoothly against the fabric without puckering or distorting the curve. While the fundamental principles remain the same, a few adjustments to your technique can yield excellent results.When working with curves, it’s essential to ease the fabric and zipper tape together. Instead of trying to force the zipper flat, gently guide it along the curve.
For particularly sharp curves, you might consider using a slightly shorter zipper than the full length of the seam, allowing for a smooth transition at the ends. Some sewers find it beneficial to baste the zipper in place first, allowing them to adjust and refine the placement before permanent stitching.
Adapting Invisible Zippers for Thicker Fabrics
Thicker fabrics, such as denim, upholstery fabrics, or heavy wools, can present challenges when installing invisible zippers due to their bulk. The standard method might result in a less-than-invisible finish or strain on the zipper teeth.To adapt the invisible zipper technique for thicker fabrics, consider the following:
- Zipper Tape Width: Opt for zippers with wider tape if available. This provides more surface area for stitching and can distribute the bulk more effectively.
- Zipper Teeth Material: Plastic coil zippers are generally more forgiving with thicker fabrics than metal zippers, as they have more flexibility.
- Stitch Length and Tension: You may need to slightly lengthen your stitch or adjust your machine’s tension to accommodate the fabric’s thickness. Test on scraps first.
- Presser Foot Adjustment: Ensure your special invisible zipper foot is set correctly to get close to the teeth without catching on them. You might need to adjust the foot’s position slightly.
- Pre-pressing: Thoroughly pressing the seam allowances and the fabric around the zipper opening is crucial. This helps to create a flat foundation.
- Hand-Basting: For very thick fabrics, hand-basting the zipper in place can be more effective than machine basting, allowing for precise control and easier adjustments.
Invisible Zippers in Lapped or Centered Applications
Invisible zippers can be seamlessly integrated into various seam types, including lapped and centered applications, providing a clean and professional finish. The key is to adjust the stitching line and the preparation of the zipper tape to match the intended seam style.For a lapped application, the zipper is typically installed on one side of the seam, with the other side of the seam forming a visible lap.
The process involves stitching the zipper to one seam allowance, then folding the other seam allowance over the zipper tape and stitching it down to create the lap. The stitching line will be slightly offset from the zipper teeth to accommodate the lapped fabric.In a centered application, the zipper is placed between two identical fabric pieces, with the seam allowances of both pieces folded over the zipper tape and stitched.
This creates a perfectly concealed zipper that appears to be part of the seam itself. The preparation involves carefully aligning the zipper teeth with the seam line of both fabric pieces before stitching.
Decorative Applications for Invisible Zippers
Beyond their functional purpose as closures, invisible zippers can also be used as a decorative element in garment and accessory design. Their subtle integration allows for interesting visual effects and unexpected design details.Here is a list of potential decorative applications for invisible zippers:
- Contrasting Colors: While typically hidden, an invisible zipper in a contrasting color can be strategically placed to add a pop of color and visual interest, especially when a portion is intentionally left visible or used in an unusual placement.
- Pattern Play: On patterned fabrics, an invisible zipper can be placed to align with a design element, creating a seamless continuation of the pattern across the closure.
- Asymmetrical Designs: An invisible zipper can be used as a design feature on an asymmetrical hemline or neckline, adding a modern and edgy touch.
- Creating Faux Seams: A carefully placed invisible zipper can mimic a decorative seam line, adding subtle detail to a plain fabric.
- Textural Contrast: When used in conjunction with different fabric textures, an invisible zipper can highlight the contrast, for example, placing a smooth zipper against a textured knit.
- Decorative Panels: In skirts or dresses, an invisible zipper can be incorporated into a decorative panel, such as a godet or a contrasting insert, adding both function and visual appeal.
Closing Notes

By following these comprehensive steps, you will gain the confidence and expertise to sew invisible zippers with precision and ease, elevating the quality and aesthetic of your handmade garments and accessories. This guide empowers you to achieve that sought-after professional polish, making every stitch count towards a flawless finish.